Developer Guide
Team: T16-03
Name: UniCa$h
User Target Profile: Our application is for university students who want to be more financially conscious about their spending habits, enabling them to make wiser economic decisions, providing students on a limited budget with more purchasing power.
Value Proposition: It provides university students with an intuitive and frictionless experience to have transparency on their expenditure to help them better understand their expenditure so they can develop better financial habits as they transition into adulthood.
Getting Started
Setting up
If you are interested in developing for UniCa$h, you can find the setup steps below:
Ensure that the project is set up locally:
- Create a fork of the GitHub repository
-
Clone the fork of the repository
git clone https://github.com/<your Github username>/tp.git -
Change to the fork local directory
cd tp/ -
Build the project
./gradlew build -
Run the project
./gradlew run
./gradlew) on Windows.
Then, to contribute to the project, we recommend the following flow:
-
Setup the original repository as the
upstreamremotegit remote add upstream https://github.com/AY2324S1-CS2103-T16-3/tp.git -
Create a feature/fix/improvement local branch
git fetch upstream master git merge upstream/master git checkout -b <branch name> - Make the necessary changes
- Create a Pull Request to the original repository
Acknowledgements
This project is based on the AddressBook-Level3 project created by the SE-EDU initiative.
The UniCa$h App icon is an open source icon named “wallet”, available for personal and commercial uses, sourced from here.
UniCa$h uses the Inter font throughout, licensed under the Open Font License and available for personal and commercial uses, sourced from here.
Terminology
| Term | Meaning |
|---|---|
| Transaction | Represents both an expense or an income. Expenses cause a net loss while incomes cause a net gain |
| Expenditure | Total amount for transactions labelled as “expense” |
| Budget | Observable metric on expenditure, tracking daily/weekly/monthly (only one) expense relative to preset budget amount |
Feature Tracking
Every user can…
- Track and manage their expenses
- Manage a budget
- View their total expenditure by the month/year
- Visualise their spending habits
Development Milestones
Milestone v1.2
Track Finances
- Add transaction
- Delete transaction
- Clear all transaction
- Edit transaction
- Find transaction(s)
- Get total expenditure
Categorize Finances
This feature serves as an extension to adding a transaction as categories provide finer details about a transaction.
Using the edit_transaction command, users can now:
- Add categories
- Edit existing categories
- Remove existing categories
Others
- Support file storage of transactions
- Remove all dependencies to original AB3
- Clean up package structure
- Configure Gradle + Github Actions for UI testing and coverage reporting
Milestone v1.3
- Support multi-format date time strings
- Expand search functionality of
findcommand - Add year support when retrieving total expenditure
- Summary visualizations for expenses
- UI improvements
- Support file storage of budget
Milestone v1.4
The bulk of this milestone was improving the documentation, ensuring clarity for readers. Such changes include:
- Adding detailed documentation about argument and prefix constraints
- Provide documentation on logic, model, and storage components
Design Overview
Architecture
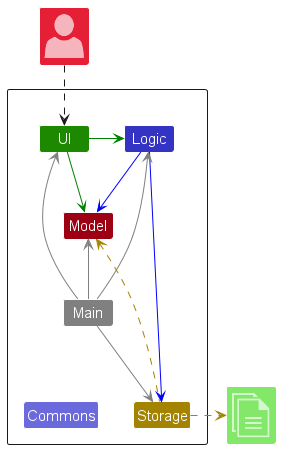
The architecture for UniCa$h leverages the existing architecture from AB3 and extends several components like supporting storage of transactions and the budget.
User Interface (UI) Component
UniCa$h is a Graphical User Interface (GUI) application, built using JavaFX. The following section describes the implementation of the various UI components in UniCa$h.
UI Components
UniCa$sh consists of the following UI components:
- Main Window
- Help Window
- Statistics / Budget Window
In this section, we will be going through the implementation of the main window.
Main Window Design
The main window consists of three components: the command input box, as well as two panes, the transaction list pane and the command results pane.
For the command input box, we have a custom CommandBox class that extends TextField to provide
the user with the ability to type their commands into the application.
For the transaction list pane, we have a custom TransactionListPanel class that is a ListView to
provide the user with a scrollable list of transactions. This view is updated whenever the user executes
commands that modify the transaction list. (i.e. add, delete, edit, clear). This ListView is displayed
in a reverse scrolling manner so that the user’s most recent transactions will be added to the top of the
TransactionListPanel, right below the CommandBox, so that the user will have immediate feedback after adding
a transaction via text input into the CommandBox.
For the command results pane, we have a custom ResultDisplay class. This pane displays the results of the
user’s command execution. This view is updated whenever the user executes commands that modify the transaction.
Error messages are also displayed here, such as when the user enters an invalid command.
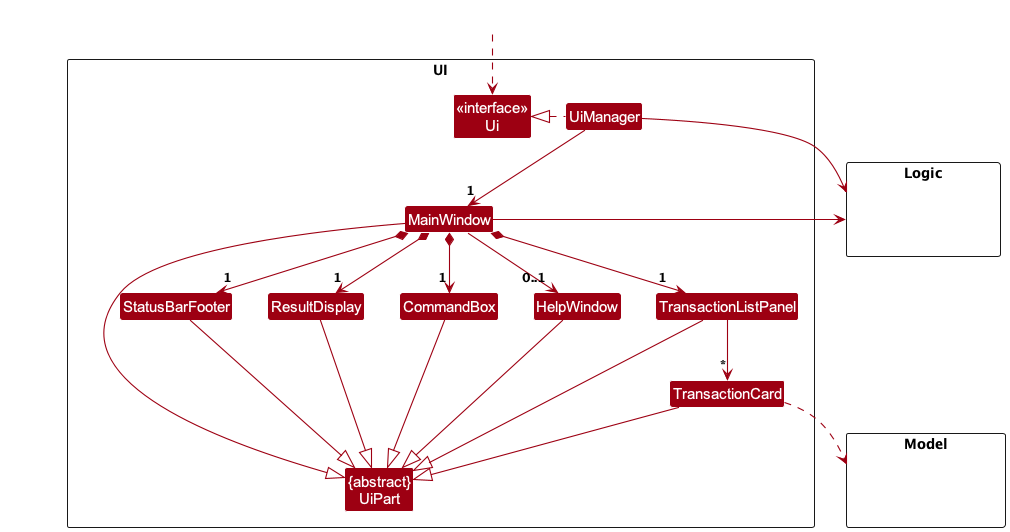
Main Window Implementation
The main window for UniCa$h is implemented using the MainWindow class. This class is made up of:
CommandBox: The command input boxTransactionListPanel: The transaction list paneResultDisplay: The command results pane
All these components, including the MainWindow, inherit from the abstract UiPart class which provides
the basic functionality of a UI component, such as the ability to set the root node of the component.
The UI component uses the JavaFx UI framework to render the UI components. The layout of these parts are defined
in the matching .fxml files that are located in src/main/resources/view folder. (e.g. The layout of the
TransactionCard is specified inTransactionCard.fxml)
The UI component is also responsible for:
- executing commands using the
Logiccomponent, through theexecuteCommandmethod - listening for changes to the
Modelcomponent, through thelistenToModelChangesmethod
UI Layout
UniCa$h is designed with users who prefer to use the keyboard in mind. Thus, almost all user input is designed for CLI-type usage, i.e. text-based keyboard input, and User Interface elements are intended to either supplement this main functionality, or provide graphical support for features.
When UniCa$h is first opened, by default, the UniCa$h welcome message will be displayed in
the Results Display. This message can also be invoked with the help command which will
be explained in the User Guide. Below are the main User Interface
(UI) components and features we have implemented in UniCa$h.

UniCa$h Main Window
- The Main Window in UniCa$h is resizeable, but has a minimum size enforced of
850 x 620 - The Menu bar contains the
FileandHelpmenus, of whichHelpcan be opened with theF1keyboard shortcut, which is also default to the originalAB-3.
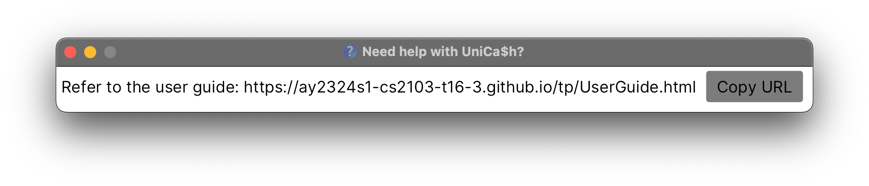
UniCa$h Help Window
- The Help Window can be opened with the
F1keyboard shortcut, which is also default to the originalAB-3. - It can also be invoked with the
helpcommand, and doing so will populate theResults Displaywith the default UniCa$h Welcome Message. - Clicking on the
Copy URLbutton will copy the URL to the clipboard.
Command Box
- The
Command Boxis the primary means by which the user interacts actively with the application. - The user types specific inputs into the
Command Boxand pressesENTERafter typing to “communicate” with UniCa$h. - Given that our application is targeted for users who prefer CLI-type text input interaction, the
Command Boxis configured such that it can remember up to10latest user inputs.- When a user presses
ENTERon any input, the input is stored regardless of its validity. - These inputs can be traversed through with the
UPandDOWNarrow keys on the keyboard. - Only the
10most recent inputs are stored by theCommand Box
- When a user presses
- At any point in time, the user can press the
ESCto empty the current text field in theCommand Box
Command Box
to continue.
Transactions List
- Each transaction stored in UniCa$h is displayed in the
Transactions List. - The entire
Transactions Listwill be displayed by default upon start-up. - Certain commands like
findmight limit theTransactions Listto a particular configuration which can be reversed with thelistcommand to show the full list. - Transactions added will immediately appear at the top of the
Transactions List, and this is to provide immediate response to the user as they will be able to see their most recently input transaction right away.
Transactions List as the
Transactions List is ordered by the time at which the user inputs the transaction, not the
actual date and time associated with that particular transaction.
Transaction Card
- The
Transactions Listcontains individualTransaction Cards, each corresponding to a singleTransactionand they look like this:
![]()
- Transaction Index (or ID/Number): All terms used synonymously to refer to the number shown on the left partition of the blue box.
- Transactions are not inherently indexed, the index values refer to the position of the
Transaction on the
Transactions List - Thus, index values are not static - depending on the configuration of currently displayed
Transactions List, this number might change.
- Transactions are not inherently indexed, the index values refer to the position of the
Transaction on the
- Transaction Name: The name of the given transaction, shown on the right partition of the blue box.
- Transaction Date & Time: The date & time assigned to the transaction, shown inside the pink box.
- Transaction Location: The location assigned to the transaction, shown inside the red box.
- Transaction Categories: The category/categories assigned to the transaction, shown inside the yellow box. This can be empty if the transaction has no categories assigned to it.
- Transaction Amount: The expense or income assigned to the transaction, shown inside the black box.
- Given that
0.00is a valid amount, its display colour and magnitude sign will depend on the type of transaction only.
- Given that
This effect is accounted for as we do not wish to limit the user to arbitrary lengths. Thus, the
get command is available to retrieve the full, expanded details
of these transactions and display them in the Results Display component.
Results Display
- The
Results Displayis the primary means by which UniCa$h “responds” back to the user via text output. - The
Results Displaycan be scrolled if the text output displayed is too long.
Data Source Indicator
- The
Data Source Indicatorshows the location of the current UniCa$h storage file.
Rolling Balance Indicator
- The
Rolling Balance Indicatorshows the net sum (i.e.total income - total expense) for the currently displayedTransactions List. - For example, if the input
find n/friendswas used to find transactions whose names contain the keywordfriends, theTransactions Listwould be updated to only show matching transactions and likewise theRolling Balance Indicatorwould reflect the net sum for these group of transactions only. - As UniCa$h starts up with the full
Transactions Listby default, theRolling Balance Indicatorwould likewise show the net sum of all transactions in UniCa$h at start-up.
Transactions List, the color of
the Rolling Balance Indicator will change based on whether the net sum is positive (green)
or negative (red) or zero (black).
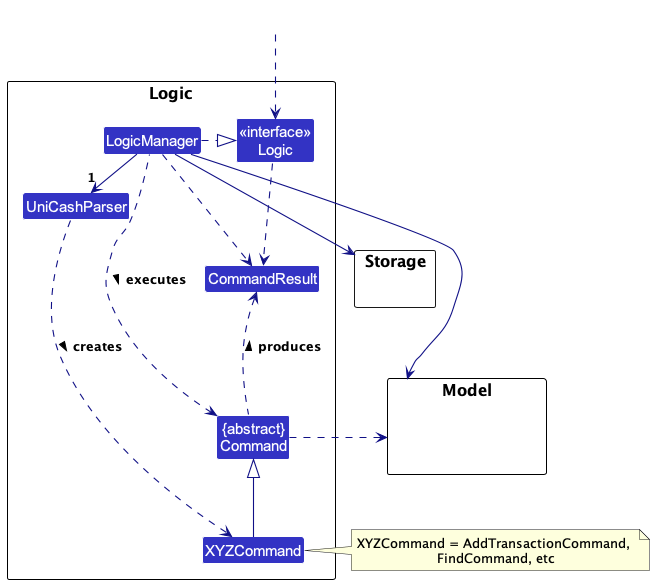
Logic Component
API : Logic.java
Here’s a (partial) class diagram of the Logic component:
The sequence diagram below illustrates the interactions within the Logic component, taking execute("delete 1") API call as an example.
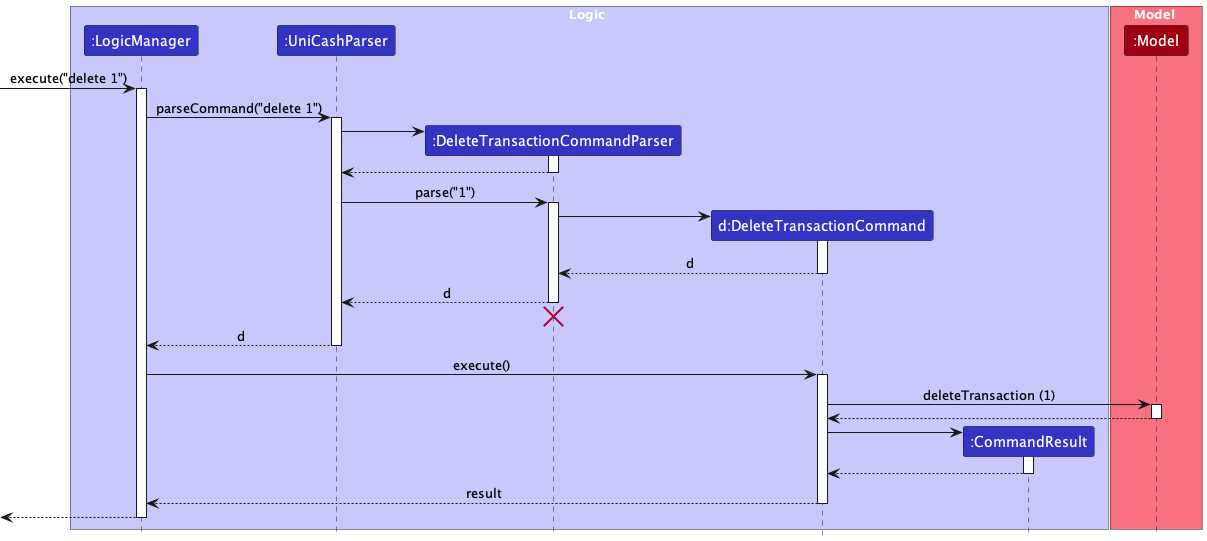
DeleteTransactionCommandParser should end at the destroy marker (X) but due to a limitation of PlantUML, the lifeline reaches the end of diagram.
How the Logic component works:
- When
Logicis called upon to execute a command, it is passed to anUniCashParserobject which in turn creates a parser that matches the command if necessary (e.g.,AddTransactionCommandParser) and uses it to parse the command.- Note that not all commands would create an additional parser such as
GetBudgetCommand,ClearBudgetCommand, etc.
- Note that not all commands would create an additional parser such as
- This results in a
Commandobject (more precisely, an object of one of its subclasses e.g.,AddTransactionCommand) which is executed by theLogicManager. - The command can communicate with the
Modelwhen it is executed (e.g. to delete a person). - The result of the command execution is encapsulated as a
CommandResultobject which is returned back fromLogic.
Here are the other classes in Logic (omitted from the class diagram above) that are used for parsing a user command:
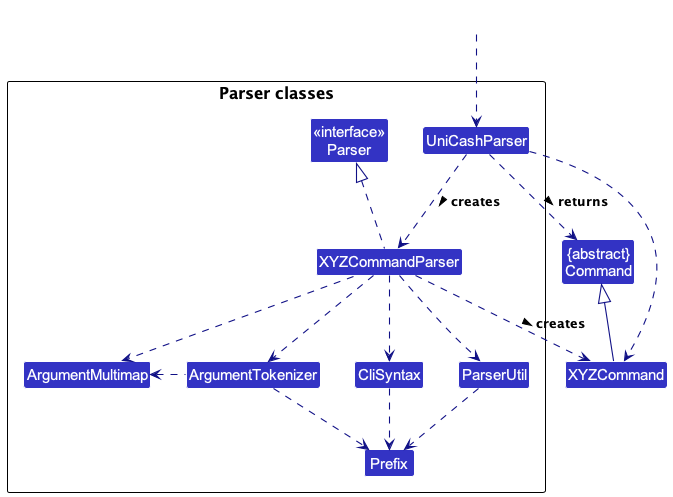
How the parsing works:
- When called upon to parse a user command, the
UniCashParserclass creates anXYZCommandParser(XYZis a placeholder for the specific command name e.g.,AddTransactionCommandParser) which uses the other classes shown above to parse the user command and create aXYZCommandobject (e.g.,AddTransactionCommand) which theUniCashParserreturns back as aCommandobject. - All
XYZCommandParserclasses (e.g.,AddTransactionCommandParser,DeleteTransactionCommandParser, …) inherit from theParserinterface so that they can be treated similarly where possible e.g, during testing. - Note that there is a dependency drawn between
UniCashParserandXYZCommandas not all commands require the use of a specialised parser class.
Model Component
API : Model.java
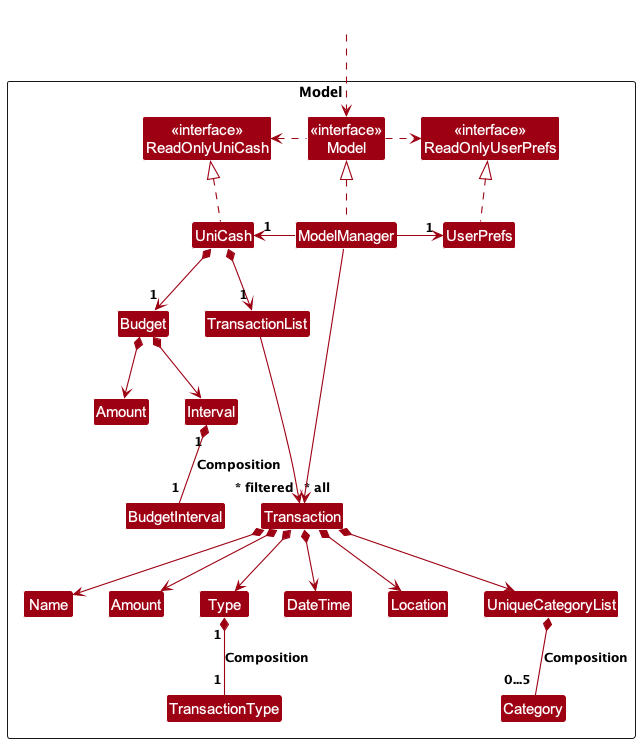
The Model component,
- stores UniCa$h data i.e., all
Transactionobjects (which are contained in aTransactionListobject), theBudgetobject andCategoryobjects (which are contained in aUniqueCategoryListobject). - stores the currently ‘selected’
Transactionobjects (e.g., results of a search query) as a separate filtered list which is exposed to outsiders as an unmodifiableObservableList<Transaction>that can be ‘observed’ e.g. the UI can be bound to this list so that the UI automatically updates when the data in the list change.- Refer here for a guide on Javafx bindings.
- stores a
UserPrefobject that represents the user’s preferences. This is exposed to the outside as aReadOnlyUserPrefobjects. - does not depend on any of the other three components (as the
Modelrepresents data entities of the domain, they should make sense on their own without depending on other components)
Storage Component

UniCa$h stores any persistent data as local JSON files, located in the same folder where the JAR file is run.
The following are the files that are created:
config.jsonpreferences.jsondata/unicash.json
Jackson is used for JSON (de)serialization and it relies on adapted models similar to the Data Transfer Object pattern.
Malformed JSONs
However, no proactive measures are applied to rectify the issue such as automatically deleting the file or fixing the error to avoid prescribing a fixed approach to resolving malformed JSONs.
While we do not make assumptions about the intended action when encountering a malformed JSON file, most JSON files will be overwritten at some point, so the malformed JSON should eventually be overwritten with proper JSON.
For data/unicash.json, this occurs when adding, editing, or deleting the transaction list or updating the budget.
For config.json and preferences.json, this occurs in the MainApp#initConfig and MainApp#initPrefs methods.
Continuous Integration (CI)
Continuous integration consists of the following:
- General unit testing
- UI testing
- Automated testing on Github
- Code coverage reporting
Github Actions is used to execute a set of behavior on a repository and is often used for Continuous Integration and Continuous Deployment.
Github Actions are created as YAML configuration files found in the
.github/workflows folder.
GitHub Actions can be generally broken down into the following components:
1. Trigger: dictates when the action is run
2. Strategy & matrix: specifies the platform (OS) and any relevant versions to run the steps
3. Steps: consists of individual steps that can use other Github Actions to perform a set of actions in sequential order
General unit testing
General unit tests cover any non-UI related aspect of UniCa$h such as models, commands, and utility.
JUnit 5, along with custom-built assertion methods like CommandTestUtil#assertCommandSuccess, are used to perform general unit testing.
UI testing
UI testing helps automate some manual testing by simulating user interaction with the UI, ensuring that the UI is responding as intended.
JUnit 5 and TestFX are used to setup and perform UI testing.
To initialize a test class to work with TestFX, annotate it with the following:
@ExtendWith(ApplicationExtension.class)
public class HelpWindowUiTest {
This leverages JUnit 5’s built-in extensions system to
inject an FxRobot argument in each unit test.
FxRobot is used as a driver to perform UI operations on the running UI, such as performing clicks, entering text, and performing keyboard inputs, along with searching for UI elements by fx:id.
@Test
public void userInput_help_showHelpWindowAsRoot(FxRobot robot) throws TimeoutException {
    // Search for elements in the UI
    var beforeHelpContainer = robot.lookup("#helpMessageContainer").tryQuery();

    assertTrue(beforeHelpContainer.isEmpty());
    // Perform a mouse click
    robot.clickOn("#commandBoxPlaceholder");

    // Enter text input
    robot.write("help");

    // Perform a keyboard input
    robot.press(KeyCode.ENTER);

    var afterHelp = robot.lookup("#helpMessageContainer").tryQuery();
    assertTrue(afterHelp.isPresent());
}
Furthermore, there are two methods of initializing the UI for testing, the first using the @Start annotation and the other uses the @BeforeEach annotation.
Using @Start
@Start when testing individual UI components.
When defining a @Start method, a Stage is injected through
the test runner and this
allows you to initialize a new Stage with custom UI components.
This is especially useful when working with individual UI components like HelpWindow and TransactionCard as it
provides a medium to render these elements without running the entire UI.
@Start
public void start(Stage stage) {
    // helpWindow is declared outside of the method to be accessed in all unit tests
    helpWindow = new HelpWindow(stage);
    stage.show();
}
@Start method is run before each test case.
Using @BeforeEach
@BeforeEach when testing the entire UI, i.e. integration testing.
When performing a general set of integration tests across the entire UI (like simulating user input to execution to
view the resulting UI changes), it is best to define a @BeforeEach method that uses FxToolkit to setup
the application (in this case, MainApp) with any given setup parameters like a default storage location.
MainApp to avoid directly modifying the save data on your local machine.
@TempDir
Path tempDir;

@BeforeEach
public void runAppToTests() throws TimeoutException {
    FxToolkit.registerPrimaryStage();
    FxToolkit.setupApplication(() -> new MainApp(tempDir.resolve("ui_data.json")));
    FxToolkit.showStage();
    WaitForAsyncUtils.waitForFxEvents(20);
}
@BeforeEach method is run before each test case.
It is also good convention to include an @AfterEach method to clean up the stages created during @BeforeEach so
that all resources are freed after every unit test:
@AfterEach
public void stopApp() throws TimeoutException{
    FxToolkit.cleanupStages();
}
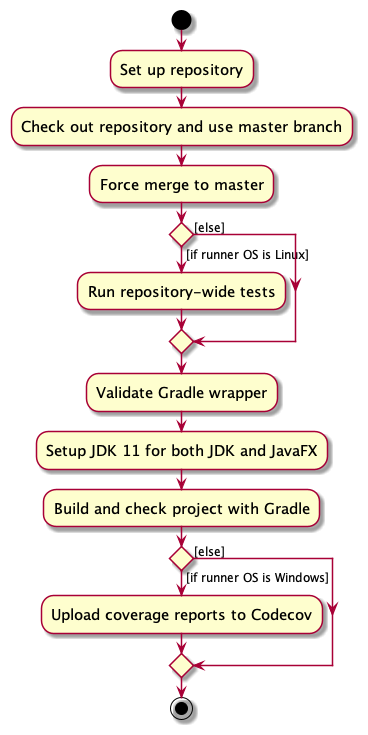
Automated testing on Github
Automated testing is achieved via the .github/workflows/unit_test.yml action.
Automated testing is triggered on every push and pull request and is run across all three major OSes: Ubuntu, MacOS, and Windows, and comprise of the following steps:

Code coverage reporting
Code coverage is generated using Github Actions and Gradle and uploaded to Codecov.
Code coverage includes both general unit tests and UI tests, and reporting is achieved through the .github/workflows/gradle.yml action.
Similar to automated testing, code coverage reporting is triggered on every push and pull request and is run across all three major OSes.
To ensure that code coverage reporting includes both general unit tests and UI tests, the following changes have been made to build.gradle:
- A new Gradle task
uiTestwas created to only run UI tests that are unit test files that end withUiTest - The default
testtask is configured to exclude such files - The
jacocoTestReporttask is modified to only depend on (i.e. run before) theuiTesttask if the system’s OS is not MacOS, Ubuntu or *nux (i.e. Windows only) - The
coveragetask includes every*.execfile generated from bothuiTestandtestso that both coverage reports are available to Codecov
The Github Action for reporting the code coverage only uploads the coverage reports to Codecov if the runner is Windows as only then will there be a complete code coverage report.
These changes work around the limitation of Linux and MacOS runners on Github Actions not supporting a headless environment.
By introducing UI testing into the code coverage reporting, we have been able to achieve a code coverage of > 90%!
User Input Builder
The UserInputBuilder class is a test utility class for the purposes of generating possible
user inputs for a given Transaction. With a given Transaction object, it becomes possible
to generate a String that represents what a user might have input in order to have
stored that Transaction. This allows for the conversion of a Transaction object
into an equivalent user-input. Such a conversion would be beneficial for FxRobot which can use
Transaction objects’ data directly to emulate user input and enter commands into the
Command Box.
Given below is a snippet of the class, including one of its constructors. As you can see,
a UserInputBuilder object is created by taking in a Transaction as one of its parameters.
public class UserInputBuilder {

    ...

    private final Transaction transaction;
    private String userInput;


    public UserInputBuilder(Transaction transaction) {
        requireNonNull(transaction);
        this.transaction = transaction;
        userInput = "";

    }
The code snippet below shows the withAllProperties() method in this class that uses the
encapsulated Transaction object to generate a concatenated string of possible user inputs.
public UserInputBuilder withAllProperties() {
        return new UserInputBuilder(transaction)
                .addName()
                .addAmount()
                .addType()
                .addLocation()
                .addDateTime()
                .addCategories();
}
For each property X, the corresponding addX() method would append the appropriate CLI
PREFIX for that property, and the property itself in a manner similar to what a user would
have to input.
public UserInputBuilder addName() {
    userInput = userInput + WHITESPACE + PREFIX_NAME + transaction.getName();

    return this;
}
Not all properties are relevant for every command, therefore each property’s relevant add()
method can be used individually to form a user input string instead of using the withAllProperties
method.
Optionally, a COMMAND WORD can also be prefixed to the
userInput as shown below, taking the CommandType enum itself as the input parameter.
public UserInputBuilder addCommand(CommandType command) {
    userInput = command.getMainCommandWord() + WHITESPACE + userInput;

    return this;
}
The use for such a utility class is demonstrated below:
public static List<String> getTestTransactionsAsUserInputs() {
    ArrayList<String> userInputList = new ArrayList<>();

    for (Transaction transaction : getTestTransactions()) {
        String userInput = new UserInputBuilder(transaction)
                .withAllProperties()
                .addCommand(CommandType.ADD_TRANSACTION)
                .toString();

        userInputList.add(userInput);

    }
    return userInputList;
}
The above method belongs to another utility class, in which the getTestTransactions() method
returns a Transaction[] array consisting of a variety of test transactions.
    ...
        for (String userInput : getTestTransactionsAsUserInputs()) {
            robot.clickOn("#commandBoxPlaceholder");
            robot.write(userInput);
            robot.type(KeyCode.ENTER);
        }
    ...
The output of the getTransactionsAsUserInputs() method is a List of Strings with each of them
corresponding to the user input required to add that particular Transaction into UniCa$h. This list can then
be passed to FxRobot to emulate user input for a variety of transactions. A snippet of such
procedure is shown above.
Support Classes and Components
StyleSheet Class
The StyleSheet class serves as a centralized information source for visual elements for all
UI components requiring some form of graphical representation. Within this class, preset colors are
defined as constants, which can then be used by UI elements across UniCa$h. Thus, when these
preset colors are modified, all UI elements will have a consistent change across UniCa$h.
In the future, given the extensibility and universality of the StyleSheet class, it is
possible to allow the user to be able to choose their own themes for the app. Below is a snippet
of constants from the StyleSheet class, used for text colour filling and font styling.
/* Text colour filling */
public static final String TEXT_FILL_RED = "-fx-text-fill: red";
public static final String TEXT_FILL_GREEN = "-fx-text-fill: green";
public static final String TEXT_FILL_BLACK = "-fx-text-fill: black";
public static final String TEXT_FILL_WHITE = "-fx-text-fill: white";

/* Font styling */
public static final String FONT_STYLE_BOLD = "-fx-font-weight: bold";
public static final String FONT_STYLE_REGULAR = "-fx-font-weight: normal";
public static final String FONT_STYLE_ITALIC = "-fx-font-style: italic";
Hash-Based Category Colouring: UniCa$h doesn’t place a restriction on the maximum number of categories available in total, across the app. Thus, colour coding each category was not possible, and a means for ensuring that unique categories (i.e. same case-insensitive name) have unique colours needed to be devised. We found that using a category’s hash code was the most optimal solution and so a method that converts a category’s hash code into a 6-digit hexademical RGB colour code was created. To offset outlier values that resulted in dark colours with poor legibility, a brightness offset function was also written, a modified snippet of that function is shown below.
  int r = Integer.parseInt(...);
  int g = Integer.parseInt(...);
  int b = Integer.parseInt(...);

  int avg = (r + g + b) / 3;

  if (avg < BRIGHTNESS_THRESHOLD) {
  r = adjustBrightness(r);
  g = adjustBrightness(g);
  b = adjustBrightness(b);
The above function determines the average brightness based on the average values of the red, green, and blue colour values, and an adjustment is made if this average falls below a certain threshold, and the threshold itself can be adjusted to achieve certain colour complexities.
The focus on colour consistency and user experience across UniCa$h is motivated by certain scientific studies that show a positive correlation between colour complexity and user engagement. This study found certain design elements contribute to increased user engagement especially by young adults. The UI components are intended to increase user engagement with UniCa$h amongst our target users, who are mostly young adults. This would consequently lead to improvement in personal financial management. Thus, even though these are not CLI features directly, they nonetheless benefit our target users and support our value proposition indirectly.
Command Usage Message Builder
Uniformly generates MESSAGE_USAGE strings to be used per command. Works well with ExampleGenerator to create consistent examples for every command using each type of prefix. Reduces the overhead of ensuring that all example values are accurate or ensuring that formatting for command usage is uniform.
Relies heavily on the builder design pattern.
Example usage of CommandUsage would be:
private static final MESSAGE_USAGE = new CommandUsage.Builder()
    .setCommandWord("set_budget")
    .setDescription("Sets the user's budget on UniCa$h.")
    .addParameter(PREFIX_AMOUNT, "Amount")
    .addParameter(PREFIX_INTERVAL, "Interval")
    .setExample(
        ExampleGenerator.generate(
            "set_budget",
            PREFIX_AMOUNT,
            PREFIX_INTERVAL
        )
    )
    .build()
    .toString();
Features & Implementation
UniCa$h comprises four key components:
Transaction Management
Transaction Model
![]()
UniCa$h tracks transactions with the use of TransactionList and Transaction. TransactionList acts
as a wrapper for a list of Transaction that enforces no null. TransactionList does not enforce any equality
constraints, thus any forms of duplicated Transaction are allowed to be stored. This was an intentional decision,
as we want to allow users to record recurring transactions.
The Transaction class is composed of the following fields
Name: The name of the transaction.Type: The transaction type of the transaction. UniCash supports expense and income only.TransactionType: An enum comprising of the valuesincomeandexpense.
Amount: The monetary value of the transaction.DateTime: The date and time of the transaction to be recorded.Location: The location where the transaction took place.UniqueCategoryList: A list of categories to be tagged with the transaction.Category: The name of a category tagged to a transaction.
The following are some noteworthy points regarding the attributes
- There are 3 compulsory fields, namely
Name,TypeandAmount. The remaining fields would fall back to a default value if not specified. - There is a character limit for
NameandLocationset at up to 500 characters. Amountentered has to be positive for bothincomeandexpense.Amountis automatically rounded to 2 decimal places.UniqueCategoryListenforces a unique (case-insensitive) constraint onCategoryit stores.UniqueCategoryListenforces a max size of 5Category- There is a character limit for
Categoryset at up to 15 characters/ - There is a limit of 100,000 transactions you can add to UniCa$h.
Transaction, refer to the prefix types section in the user guide.
Add Transaction
Overview
The add_transaction command adds a new Transaction to the TransactionList in UniCash.
The activity diagram of adding a Transaction is as shown below
![]()
The following sequence diagram shows how the different components of UniCash interact with each other
![]()
The above sequence diagram omits details on the creation of the attributes of a Transaction such as
Name, Type and Amount as it would make the diagram cluttered and difficult to read without adding
additional value.
AddTransactionCommandParser should end at the destroy marker (X) but due to a limitation of PlantUML,
the lifeline reaches the end of diagram.
Details
- The user specifies the transaction to be added by stating the name, amount, transaction type as well as any other optional fields.
- The input will be parsed by
AddCommandTransactionParser, and if it is invalid,ParserExceptionis thrown, prompting for the user to enter again. - If the input is valid, a
Transactionobject is created and passed into theAddTransactionCommandto be executed by theLogicManager. - The
LogicManagerwill then invoke the execute command, adding theTransactionto UniCash.
Note that only the Category field is allowed to be specified multiple times, while the other fields can only be specified once, else
a ParserException is thrown. Another noteworthy point is that Category that are added are to be case-insensitively unique and can only be up to
a specified value of 5 in the UniqueCategoryList class. Else, a ParserException would be thrown.
Get Total Expenditure
Overview
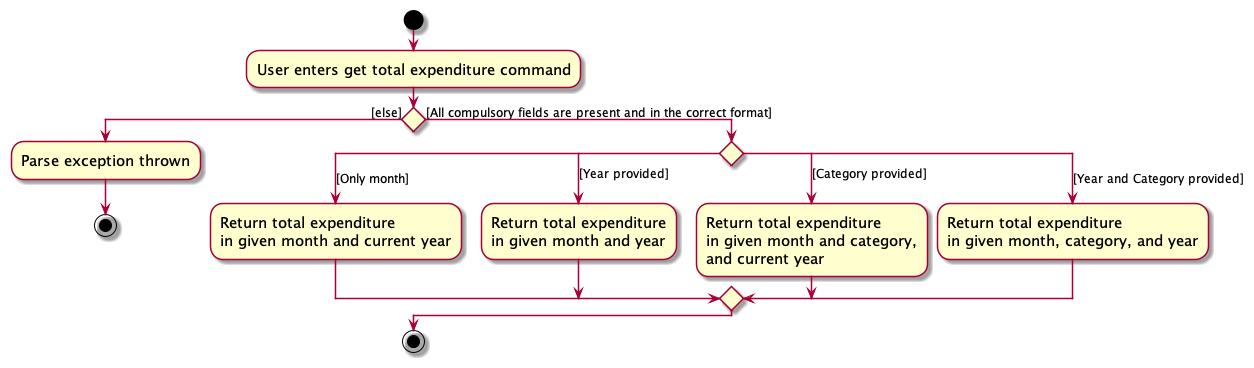
The get_total_expenditure command returns the total expenditure across a given month among all expense transactions in UniCa$h, with optional filters for a given category and year.
The activity diagram of getting the total expenditure is as shown below
The following sequence diagram shows how the different components of UniCash interact with each other
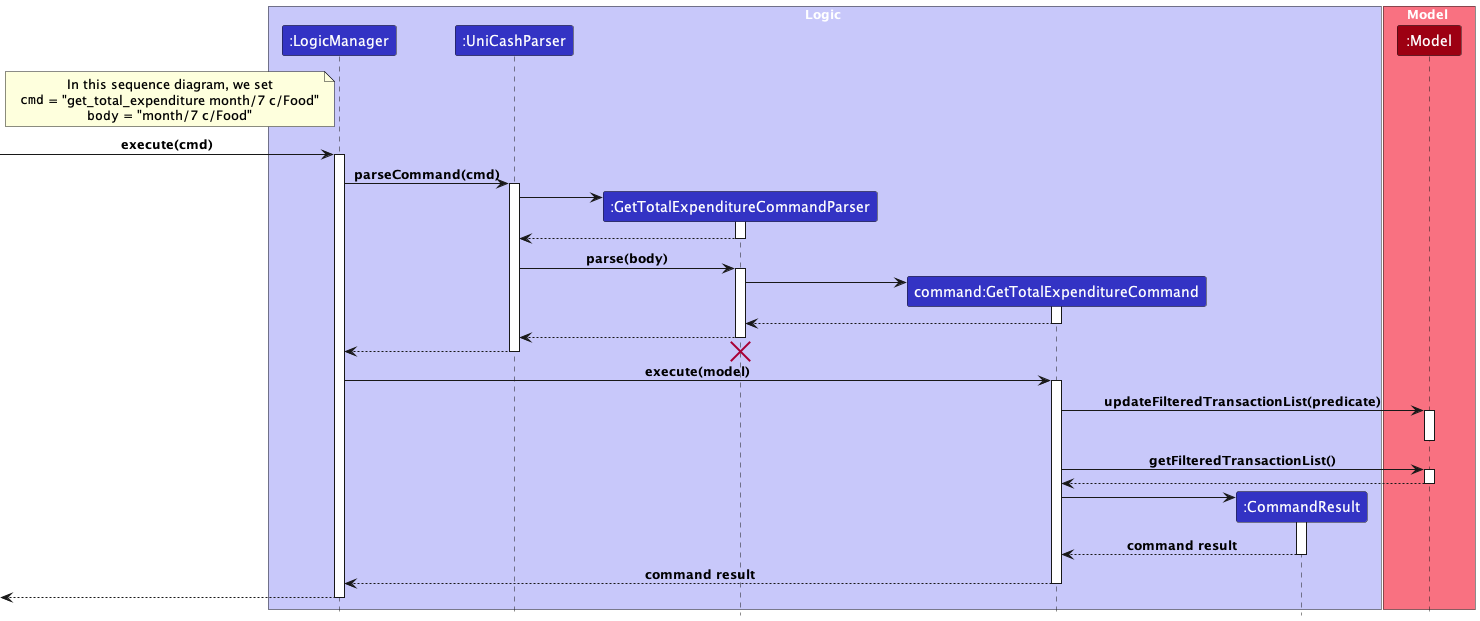
The above sequence diagram omits details on the creation of the arguments of a GetTotalExpenditureCommand such as
Category as it would make the diagram cluttered and difficult to read without adding additional value. It also omits
the specific predicate behavior of provided to perform the filtering.
GetTotalExpenditureCommandParser should end at the destroy marker (X) but due to a
limitation of PlantUML, the lifeline reaches the end of diagram.
Details
- The user specifies the month to retrieve the total expenditure and the optional category
- The input will be parsed by
GetTotalExpenditureCommandParser, and if it is invalid,ParserExceptionis thrown, prompting for the user to enter again - If the input is valid, a
GetTotalExpenditureCommandobject is created to be executed by theLogicManager, since no year is provided, the current year is inferred - The
LogicManagerwill then invoke theexecutemethod of the command, filtering the existing transaction list to only includeexpensetype transactions that fall in the given month and category (if any) - The
GetTotalExpenditureCommandalso calculates the total expenditure from this filtered list of transactions
The month to search is one-indexed, so it ranges from
[1, 12]
The year has to be
>= 1920
The category is a single filter that is matched in a case-insensitive manner
Delete Transaction
Overview
The delete_transaction command deletes an existing Transaction from the TransactionList in UniCa$h.
The activity diagram of deleting a Transaction is as shown below
![]()
The following sequence diagram shows the interaction between different components of UniCash.
![]()
The above sequence diagram omits details on the filtering of TransactionList and assumes that
the displayed TransactionList is showing all transactions. However, the logic of the DeleteCommand
remains the same for all list deletion.
DeleteTransactionCommandParser should end at the destroy marker (X) but due to a limitation of PlantUML, the lifeline reaches the end of diagram.
Details
- The user specifies the transaction to be deleted by stating the appropriate index of the transaction to be deleted.
- The input will be parsed by
DeleteTransactionCommandParserand if the provided index is invalid,ParseExceptionwill be thrown, and the user is prompted to enter the command again with the valid index. - If the input is valid, an
Indexobject is created with the given input index, and passed intoDeleteTransactionCommandto be executed byLogicManager LogicMangerwill invoke theexecutemethod ofDeleteTransactionCommandwhich will delete theTransactionfrom UniCa$h.
INDEX constraints in command breakdown’s Argument Types section in the User Guide.
You can also refer to the UI Layout’s Transaction Card section to learn about the transaction index values that
can change based on the current Transactions List configuration.
Edit Transaction
Overview
The edit_transaction command edits an existing Transaction from the TransactionList in UniCa$h.
The following sequence diagram shows how the different components of UniCa$h interact with each other. It is further explained in the Details section below.
![]()
EditTransactionCommandParser should end at the destroy marker (X) but due to a limitation of PlantUML, the lifeline reaches the end of diagram.
Details
- The user specifies the transaction to be edited by first stating the (one-based) index of the transaction they want to edit. This
is followed by listing the fields and updated values that they would like to edit.
(E.g.
edit_transaction 1 n/Food Clique c/food) - The user input with the requested edits will be parsed by
EditCommandTransactionParser, and if it is invalid,ParserExceptionis thrown, prompting for the user to enter again. It is important to note that at this point, a valid index is any integer that is 1 or greater. - If the input is valid, the
EditCommandTransactionParsercreates anEditTransactionDescriptorobject, which contains the edits which the user wishes to make to the transaction. - An
EditTransactionCommandis constructed with the one-based index of the transaction to edit and theEditTransactionDescriptorobject. ThisEditTransactionCommandis then returned by theEditCommandTransactionParser - The
LogicManagerwill then invoke the execute command of theEditTransactionCommand, editing theTransactionin UniCa$h. - The
EditTransactionCommand#executemethod then first checks if the one-based index is too large (i.e. if there are onlyntransactions, but the index provided is greater thann). If this is true, then aCommandExceptionis thrown, prompting the user to input an index that is at most, the number of transactions available. If theCommandExceptionis not thrown at the step above, then the execution proceeds. - The
EditTransactionCommand#executemethod then calls thecreateEditedTransactionmethod, which creates a newTransactionobject with the updated values after editing. Note that thisTransactionobject is a different object from what is stored in UniCa$h. - The
EditTransactionCommand#executemethod then updates UniCa$h with the newTransactionusing theModel#setTransactionmethod.
Name, Amount, and Type fields cannot be left blank. The constraints laid
out in the Add Transaction section above also remain.
Clear Transactions
Overview
The clear_transactions command deletes all existing Transactions from TransactionList in UniCash.
The activity diagram of clearing all transactions is as shown below
![]()
The following sequence diagram shows the interaction between different components of UniCa$h.
![]()
Details
- The user inputs the command to clear all transactions
- The input will be parsed by
ClearTransactionsCommandParserand if the provided input is invalid (i.e. trailing arguments)ParseExceptionwill be thrown, and the user is prompted to enter the command again with the correct input. - If the input is valid, a
ClearTransactionsCommandobject is created to be executed byLogicManager LogicManagerwill invoke theexecutemethod ofClearTransactionsCommandwhich will invoke theModelobject to be set with a newUniCashobject, which would contain an emptyTransactionList.
Here, it must be noted that unlike DeleteTransactionCommand, individual transactions in the TransactionList
are not deleted singularly. As opposed to iteratively deleting each transaction in the TransactionList, the more
efficient way to achieve the same effect would be to simply set the Model contained in LogicManager to a new
UniCash object, as the newly created UniCash object would now have an empty TransactionList encapsulated within.
This emulates the deletion of all transactions in the TransactionList.
Get Transaction
Overview
The get command retrives an existing Transaction from TransactionList in UniCa$h.
The activity diagram of retrieving a Transaction is as shown below
![]()
The following sequence diagram shows the interaction between different components of UniCa$h.
![]()
The above sequence diagram omits details on the filtering of TransactionList and assumes that
the displayed TransactionList is showing all transactions. However, the logic of the GetCommand
remains the same for all transaction retrieval.
GetCommandParser should end at the destroy marker (X) but due to a limitation of PlantUML, the lifeline reaches the end of diagram.
Details
- The user specifies the transaction to be retrieved by stating the appropriate index of the transaction.
- The input will be parsed by
GetCommandParserand if the provided input is invalid,ParseExceptionwill be thrown, and the user is prompted to enter the command again with the correct input. - If the input is valid, an
Indexobject is created with the given input integer, and passed intoGetCommandto be executed byLogicManager LogicMangerwill invoke theexecutemethod ofGetCommandwhich will retrieve theTransactionfrom UniCa$h.
INDEX constraints in command breakdown’s Argument Types section in the User Guide.
You can also refer to the UI Layout’s Transaction Card section to learn about the transaction index values that
can change based on the current Transactions List configuration.
Reset UniCa$h
Overview
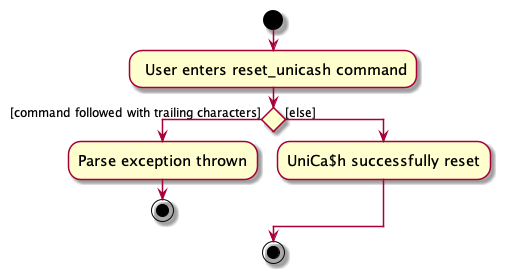
The reset_unicash command overwrites the TransactionListwith the default
UniCa$h Transactions.
The activity diagram of resetting UniCa$h is as shown below
The following sequence diagram shows the interaction between different components of UniCa$h.
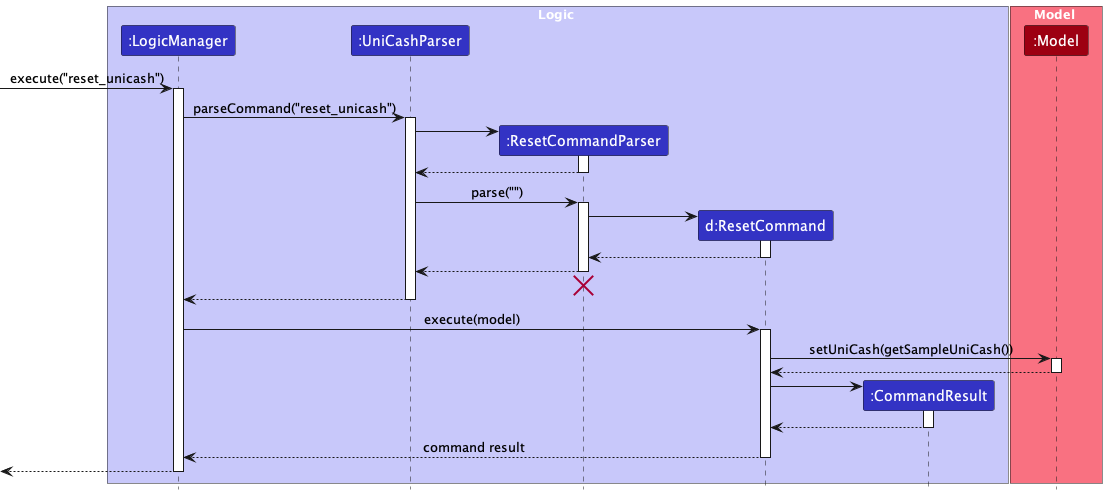
ResetCommandParser should end at the destroy marker (X) but due to a limitation of PlantUML, the lifeline reaches the end of diagram.
Details
- The user inputs the command to reset UniCa$h.
- The input will be parsed by
ResetCommandParserand if the provided input is invalid (i.e. trailing arguments)ParseExceptionwill be thrown, and the user is prompted to enter the command again with the correct input. - If the input is valid, a
ResetCommandobject is created to be executed byLogicManager LogicManagerwill invoke theexecutemethod ofResetCommandwhich will invoke theModelobject to be set with a sampleUniCashobject which would contain aTransactionListpopulated with sample Transaction data.
Transactions List with the original transactions only, and does not refer to
clearing any contained budgets
Find Transactions
Overview
The find command searches UniCa$h for Transactions that match the input search parameters.
The activity diagram of finding transactions in UniCa$h is as shown below
![]()
The following sequence diagram shows the interaction between different components of UniCa$h
during the sequence of processing and execution of the find command
![]()
FindCommandParser should end at the destroy marker (X) but due to a
limitation of PlantUML, the lifeline reaches the end of diagram.
Details
- The user inputs the command to search for transactions with specified parameters
- The input will be parsed by
FindCommandParserand if the provided input is invalid,ParseExceptionwill be thrown, and the user is prompted to enter the command again with the correct input.- You can refer to the User Guide for the input constraints for the
findcommand here.
- You can refer to the User Guide for the input constraints for the
- If the input is valid, a
FindCommandobject containing aPredicate<Transaction>is created byFindCommandParserto be executed byLogicManager LogicManagerwill invoke theexecutemethod ofFindCommandwhich will invoke theModelproperty to update its filtered transactions list according to the predicate contained insideFindCommand.
Notes
- Every transaction property that can be searched with the
findcommand contains an associated property predicate._ - For the
findcommand, these predicates are “composed” by theTransactionContainsAllKeywordsPredicateclass. - This class simulates a composed predicate that represents a short-circuiting logical
ANDof all property predicates.- Encapsulated within the class is a list of transaction predicates.
- The overriding
testmethod returns true only if the inputTransactionmatches all predicates in this list, and a snippet of it is shown below.
public boolean test(Transaction transaction) { if (predicateList.isEmpty()) { return false; } return predicateList.stream() .allMatch(predicate -> predicate.test(transaction)); } - In summary, the
FindCommandParseris responsible for parsing the user input and “converting” each input into the associated property predicate, and then creating theFindCommandobject itself with the above-mentioned composed predicate class.
Budget Management
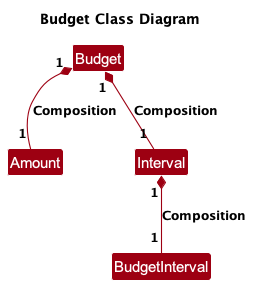
Budget Model
data/unicash.json, much like the transactions. Refer to the storage component for more details.
UniCa$h tracks a user’s budget with the use of Budget.
The Budget class is composed of the following fields
Amount: The amount allocated to the budget.Interval: The budget interval of the transaction.BudgetInterval: An enum consisting of the valuesday,weekandmonth.
The following are some noteworthy points regarding the attributes
Amounthere follows the same constraints as the one mentioned in theTransaction’sAmountclass.
Budget, refer to the prefix types section in the user guide.
Expenses that fall within the interval are included and the total expense is computed relative to the budget.
1. Daily: expenses that occur within the same day of year (i.e. the expenses that occur on day
x are included if today is day x, expenses on day x +/- 1 are not included)
2. Weekly: expenses that occur within the same week of year. This is dependent on the current year, for more information refer to the documentation here.
3. Monthly: expenses that occur within the same month (i.e. the expenses that occur in September are included if today falls under September)
Set Budget
Overview
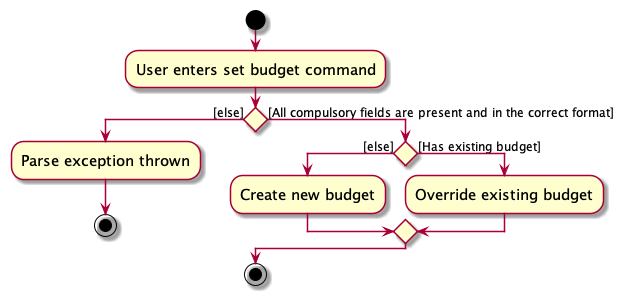
The set_budget command sets a user defined budget globally across UniCa$h.
The activity diagram of getting the total expenditure is as shown below
The following sequence diagram shows how the different components of UniCash interact with each other
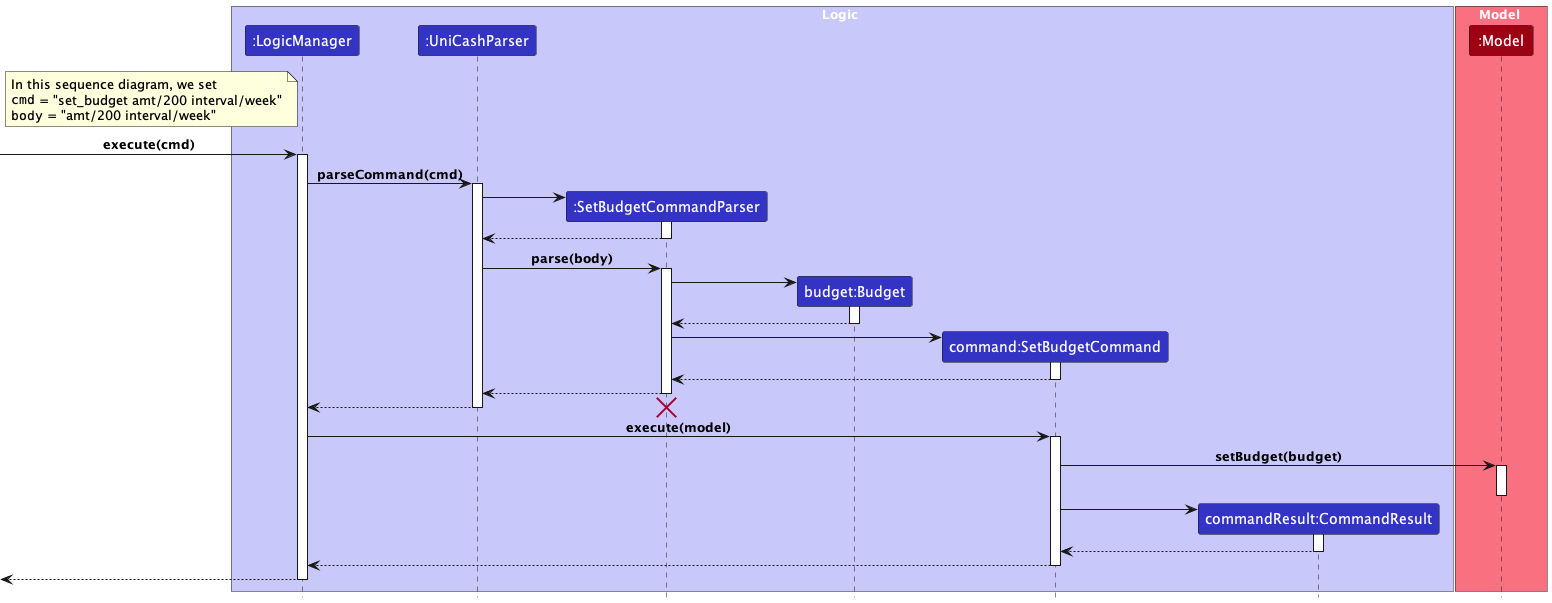
The above sequence diagram omits details on the creation of the arguments of a SetBudgetCommand such as
Amount and Interval as it would make the diagram cluttered and difficult to read without adding additional value.
It also omits the file saving aspect of this, where the updated budget is saved to the data/unicash.json file.
SetBudgetCommandParser should end at the destroy marker (X) but due to a
limitation of PlantUML, the lifeline reaches the end of diagram.
Details
- The user specifies amount and interval that the budget will operate on
- The input will be parsed by
SetBudgetCommandParser, and if it is invalid,ParserExceptionis thrown, prompting for the user to enter again - If the input is valid, a
SetBudgetCommandobject is created to be executed by theLogicManager - The
LogicManagerwill then invoke theexecutemethod of the command, setting the budget in theModelManager
Clear Budget
Overview
The clear_budget command removes the globally set UniCa$h budget. If no budget is present, the user is prompted to set one using set_budget instead.
clear_budget will not parse any additional argument or parameters. Even if additional argument or parameters are given, any existing budget will be cleared regardless, without any additional effects.
The following sequence diagram shows how the different components of UniCash interact with each other
![]()
This sequence diagram omits the file saving aspect of the command, where data/unicash.json is updated to now hold a null budget value.
Details
- The user runs the clear budget command
- The command will be parsed by
UniCashParserand aClearBudgetCommandobject is created and executed by theLogicManager - The
LogicManagerwill then invoke theexecutemethod of the command - The command will check if UniCa$h currently contains an existing budget, if it does not, a “no budget” message is returned, otherwise, the existing budget is cleared and a success message is returned instead
Get Budget
Overview
The get_budget command computes the total expenditure relative to the existing budget within the given interval. If no budget is present, the user is prompted to set one using set_budget instead.
Intervals work by filtering by the specified time period:
- For
dayintervals, only transactions of the same day are found - For
weekintervals, only transactions of the same week of year are found - For
monthintervals, only transactions of the same month are found
get_budget will not parse any additional argument or parameters. Even if additional argument or parameters are given, no additional effects will be triggered.
The following sequence diagram shows how the different components of UniCash interact with each other
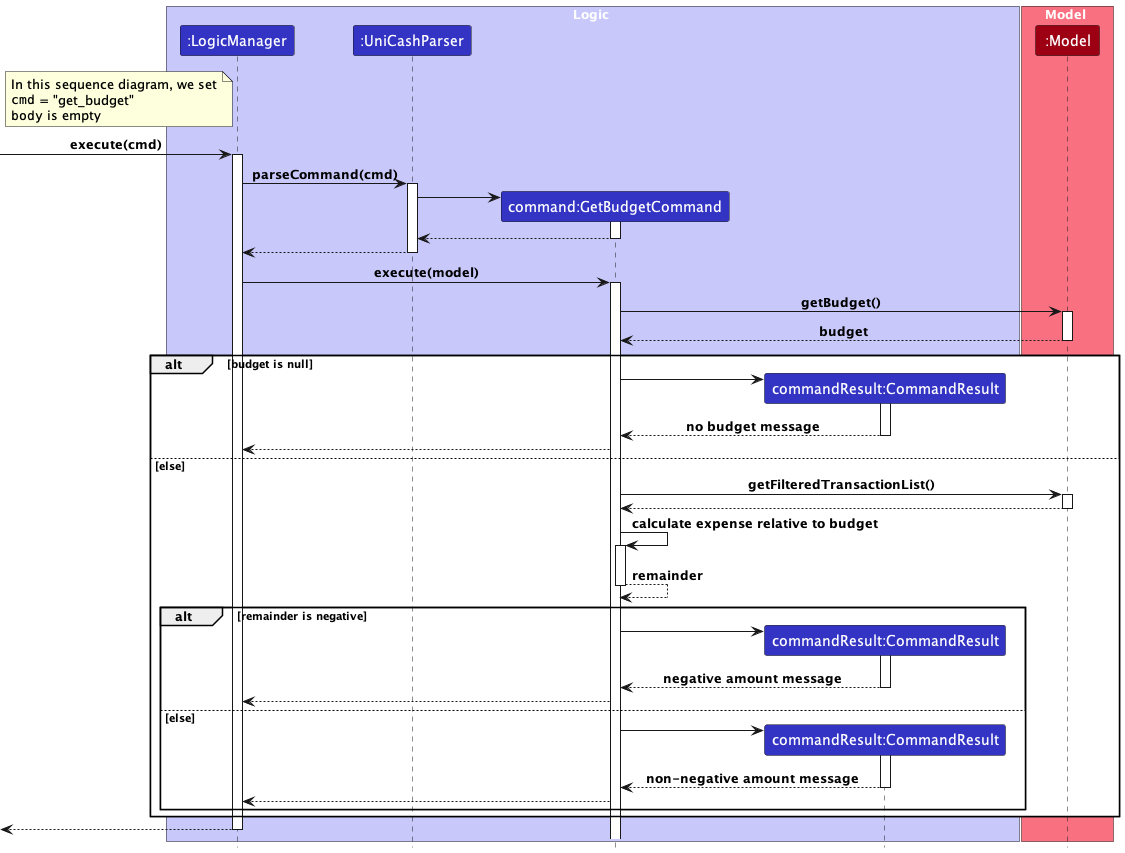
The above sequence diagram omits details such as internal method calls to GetBudgetCommand#getIntervalFilter and GetBudgetCommand#getIntervalString to reduce clutter.
Details
- The user runs the get budget command
- The command will be parsed by
UniCashParserand aGetBudgetCommandobject is created and executed by theLogicManager - The
LogicManagerwill then invoke theexecutemethod of the command - The command will check if UniCa$h currently contains an existing budget, if it does not, a “no budget” message is returned, otherwise, the budget remainder will be calculated
- If the remainder amount is negative (
< 0.00), then a negative amount message will be returned - Otherwise, a non-negative message will be returned
- symbol before the $ so -$xx.xx whereas the non-negative message does not contain the - symbol
Summary Statistics
Overview
The summary command creates a pop-up summary window that contains summary plots to provide some basic analytics about
the user’s expense data.
The activity diagram of the summary command is given below:
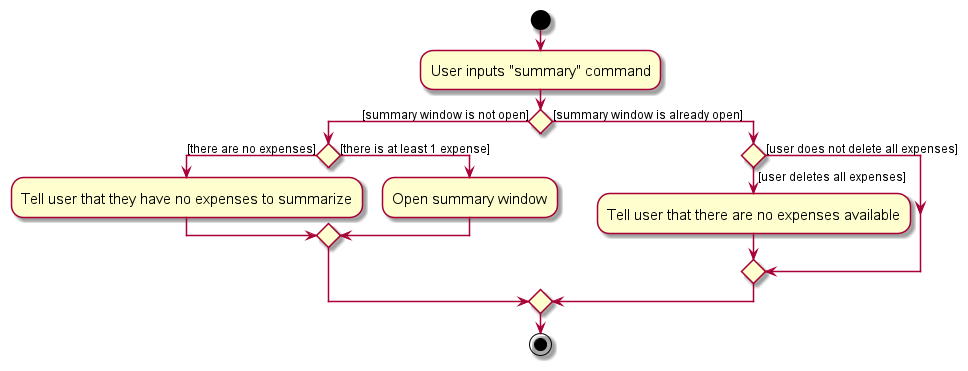
Let’s first go over the sequence of events that occur within the Ui component first to understand the code that performs the activities shown in the activity diagram above. The sequence diagram below documents this:

LogicManager and
updating the SummaryWindow with the expense data. More information is provided under the “Details” section below.
Details
- The user runs the “summary” command
- The command is parsed by the
Logiccomponent, which is explained in another sequence diagram below, and returns a CommandResult object. MainWindowupdates theResultDisplayobject with theCommandResult#getFeedbackToUsermethod.- In the “get expense data” step in the sequence diagram,
MainWindowgets the updated expense summary per category and per year-month from theLogiccomponent using theLogic#getExpenseSummaryPerCategoryandLogic#getExpenseSummaryPerYearMonthmethods. - In the “update with expense data” step in the sequence diagram,
MainWindowcallsLogic#setPieChartandLogic#setLineCharton the result to update the pie chart and line chart data (stored withinSummaryWindow). - If the
commandResultobject’sshowSummaryattribute istrue, then it indicates that the summary window should open. Subsequently,MainWindowperforms a self-invocation by calling its ownhandleSummarymethod. Otherwise, the execution ends. - Under the
handleSummarymethod:MainWindowchecks to see ifSummaryWindowis already opened by callingSummaryWindow#isShowing. If this is false, thenSummaryWindow#focusis called.- Otherwise,
Logic#getExpenseSummaryPerCategoryis called to retrieve the expense summary per category formatted in aHashMap<String, Double>. The result is passed as an argument when calling theSummaryWindow#showmethod. - Within the
SummaryWindow#showmethod, a check is first performed to determine if the expense summary is empty. If this is true, then the summary window does not open. Otherwise, the summary window is opened.
Next, we delve deeper into the Logic component, specifically when MainWindow executed the
LogicManager.execute("summary") line of code. The sequence diagram for this portion is given below.
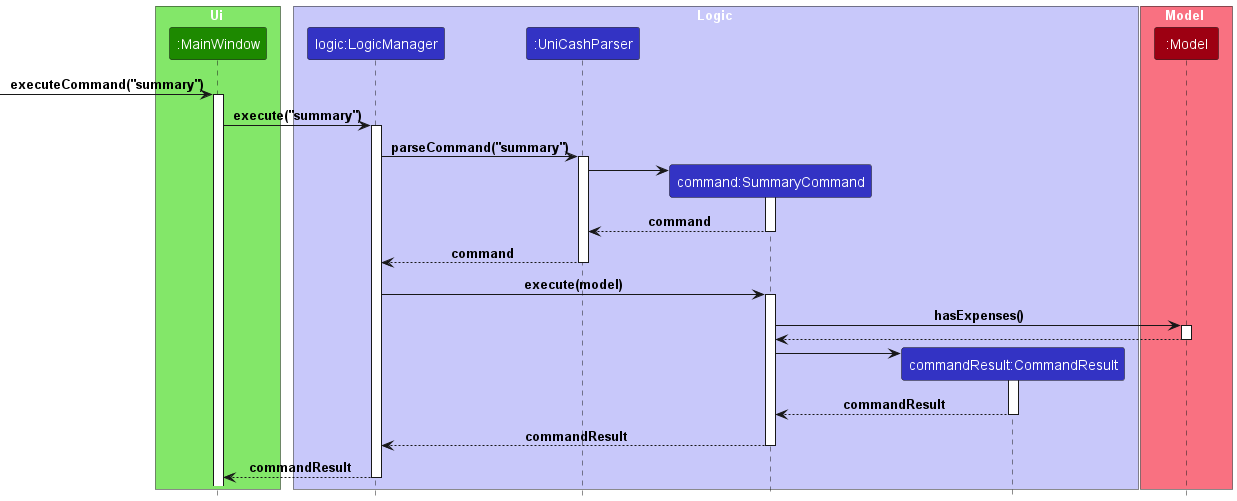
Similar to all other commands, the raw user input String “summary” is parsed by UniCashParser to create a
SummaryCommand object, which is returned to LogicManager. LogicManager then calls the execute method of the
newly-created SummaryCommand object. At this point, the SummaryCommand object first checks if there are any expenses
available by calling Model#hasExpense. It then instantiates a CommandResult object to be returned to MainWindow.
CommandResult constructor depends on whether Model#hasExpense evaluates to
true. In particular, the feedbackToUser and showSummary parameters of the CommandResult constructor differ. If
there are no expenses available, the feedbackToUser string will contain a message to tell users that they have no
expenses to summarize. This allows us to display different messages to ResultDisplay according to whether there are
expenses available or not. Also, the showSummary parameter will be set to false, preventing the
MainWindow#handleSummary method from running, as explained in the prior sequence diagram.
General Utility
Help
Overview
The help command can be used in 2 different ways.
helpwith no arguments.help COMMAND_WORDwith 1 argument containing a command word.
Details
help
Opens a Help Window with a link to our User Guide and displays a help message on the right panel containing a list of all our commands.
help add_transaction
A help message specific to the command word on the right panel. The message will contain information on that command and provide instructions on how to run that command.
Exit
exit
This command will exit UniCa$h.
Appendix
Appendix: Requirements
Non-Functional Requirements
- The application should be cross-platform functional on major operating systems, i.e. Windows, MacOS, Linux, running at least Java 11
- All transactions and budget managed by the user should be saved and backed up locally and restored the next session as long as the data has not been corrupted
- The user guide should be clear and straightforward so that the user can perform all major tasks intuitively
- All non-private methods should be well-documented to ensure that the codebase is maintainable
- The application should have an intuitive interface with easy navigation commands and clear instructions/errors
- The application achieves at least 85% in test coverage with comprehensive unit and integration tests
- The user should not experience excessive sluggishness while using the application
- The application should serve the latest updates of transactions the moment these updates are confirmed
- The application should not require an active Internet connection to function
- The application should be able to generate visualisations for 1000 expenses without any excessive sluggishness
User Stories
High (must have) -
* * * Medium (nice to have) -
* * Low (unlikely to have) -
*
| Priority | As a … | I want to … | So that I can… |
|---|---|---|---|
* * * |
tech-savvy NUS student | add a new transaction | track my cash flow |
* * * |
tech-savvy NUS student | retrieve a list of all my transactions with all transaction details | check if I have forgotten to log some transactions |
* * * |
tech-savvy NUS student | get a transaction | locate details of a transaction without having to go through the entire list |
* * * |
tech-savvy NUS student | delete transactions | remove transactions I no longer need |
* * * |
tech-savvy NUS student | edit transactions that have been created | rectify incorrect inputs in my transactions |
* * * |
tech-savvy NUS student | view my total expenditure | see at a glance how much I have spent in total without having to manually tabulate |
* * * |
tech-savvy NUS student | find transaction(s) by name, location and/or category | locate specific transactions and its associated details without having to go through the entire list |
* * * |
tech-savvy NUS student | view my total expenditure by month/year and filter by category | check my expenditure in specific areas without having to manually tabulate |
* * * |
tech-savvy NUS student | clear all my transactions | start afresh with no transaction history |
* * |
tech-savvy NUS student | set a daily/weekly/monthly budget | spend within my limits |
* * |
tech-savvy NUS student | check the budget that I set | the spending limit I set for myself |
* * |
tech-savvy NUS student | check my remaining budget | see at a glance if I am spending within limits |
* * |
tech-savvy NUS student | clear my current budget | start afresh with no budget set |
* * |
tech-savvy NUS student | view a graphical summary of my transactions | see my cash flow at a glance |
* * |
tech-savvy NUS student | input different DateTime formats in my transactions | use the application with ease |
* * |
tech-savvy NUS student | use command keyword abbreviations | use the application efficiently |
* * * |
tech-savvy NUS student | see usage instructions | refer to instructions when I forget how to the App |
* * |
tech-savvy NUS student | see usage instructions for a command | refer to instructions when I forget how to the command |
* * * |
tech-savvy NUS student | reset the application | restore it to the original state |
* * * |
tech-savvy NUS student | exit the application | close the application |
* |
tech-savvy NUS student | import my transaction data from a spreadsheet to the app | input all my historical expenses without having to manually input them one at a time |
* |
tech-savvy NUS student | export my transaction data to a spreadsheet | backup my transaction data |
* |
tech-savvy NUS student | fix a ratio to be set aside from my excess funds every month | still have a portion of my savings even when I make big purchases |
* |
tech-savvy NUS student | add transactions that are due on a recurring basis | include recurring expenditures without having to manually input them every time they occur |
* |
tech-savvy NUS student | receive autofill recommendations based on my historical inputs | save time typing the full command and reduce the chance of making a mistake |
Use Cases
The following documents use cases for our application
For the following Use Cases (unless specified otherwise):
- The System is
UniCa$h - The Actor is
User
Use Case: UC01 - Adding a Transaction
MSS:
- User enters the command to add a transaction.
- User submits the request.
-
UniCa$h adds the transaction to the transactions list and displays success message.
Use Case ends
Extensions
- 2a. User enters an incorrect format
- 2a1. UniCa$h displays an error message with the correct command format.
- Use case resumes at step 1.
- 2b. User enters an extremely high number
- 2b1. UniCa$h prompts the user with a warning of the input
- 2b2. User confirms the request
- Use case resumes at step 3.
Use Case: UC02 - Delete a transaction
MSS:
- User enters the command to delete a transaction.
- User submits the request.
- UniCa$h finds the transaction based on the passed in arguments.
- UniCa$h deletes the transaction.
-
UniCa$h displays success message.
Use Case ends
Extensions
- 2a. User enters an incorrect format.
- 2a1. UniCa$h displays an error message with the correct command format.
- Use case resumes at step 1.
Use Case: UC03 - Editing a Transaction
MSS:
- User enters the command to edit an existing transaction’s fields.
- User submits the request.
-
UniCa$h makes the edits specified in the command and displays all the fields of that transaction.
Use Case ends.
Extensions
- 2a. User provides a field in an incorrect format. (e.g. amount is not expressed as a float, name is empty,
unrecognized datetime format, etc.)
- 2a1. UniCa$h displays an error message that requests for correct format.
- Use case resumes at step 1.
- 2b. User requests to edit a transaction that does not exist
- 2b1. UniCa$h displays an error message informing the user that the transaction cannot be found.
- Use case resumes at step 1.
- 2c. User does not specify which field of a transaction to edit
- 2c1. UniCa$h displays an error message and displays the correct way to format the edit command.
- Use case resumes at step 1.
Use Case: UC04 - Listing all Transactions
MSS:
- User enters the command to list all transactions.
- User submits the request.
-
UniCa$h retrieves the list of all transactions and displays them for the User.
Use Case ends.
Extensions
- 2a. User enters the command with the incorrect format (i.e. with parameters).
- 2a1. UniCa$h displays an error message, requests for the correct format.
- Use case resumes from step 1.
- 3a. There are no transactions for UniCa$h to retrieve.
- 3a1. UniCa$h displays no transactions, and informs the user that all transactions have been retrieved.
- Use Case ends.
Use Case: UC05 - Finding a Transaction
MSS:
- User enters the command to find transactions.
- User submits the request.
-
UniCa$h filters the transactions based on the specified filters and returns the filtered list of expenses with a success message.
Use Case ends.
Extensions
- 2a. User enters an incorrect format.
- 2a1. UniCa$h displays an error message, requests for correct format.
- Use case resumes from Step 1.
Use Case: UC05 - Get Total Expenditure
MSS:
- User enters the command to get the total expenditure.
- User submits the request.
- UniCa$h parses the command, and it is in the right format.
- UniCa$h calculates the expenditure based on the parameters passed in.
-
UniCa$h displays the calculated expenditure.
Use Case ends.
Extensions
- 3a. UniCa$h parses command, and detects that user entered the incorrect format (missing fields)
- 2a1. UniCa$h displays an error message, requests for command to be re-entered.
- Use case resumes at step 1
Use Case: UC06 - Clear all transactions
MSS:
- User enters the command to clear all transactions.
- User submits the request.
- UniCa$h deletes all transactions in the transactions list.
-
UniCa$h displays success message.
Use Case ends.
Extensions
- 2a. User enters an incorrect format.
- 2a1. UniCa$h displays an error message with the correct command format.
- Use case resumes at step 1.
Use Case: UC07 - Reset UniCa$h
MSS:
- User enters the command to reset UniCa$h.
- User submits the request.
- UniCa$h restores all transactions in the transactions list to the default transactions
-
UniCa$h displays success message.
Use Case ends.
Extensions
- 2a. User enters an incorrect format.
- 2a1. UniCa$h displays an error message with the correct command format.
- Use case resumes at step 1.
Use Case: UC08 - Show Summary Statistics
MSS:
- User enters the command to get the summary for their expenses.
- User submits the request.
- UniCa$h summarizes the user’s saved expenses by month and by category.
-
UniCa$h displays summary plots for the user to analyze their expenses.
Use Case ends.
Extensions:
- 2a. UniCa$h does not contain any of the user’s expenses.
- 2a1. UniCa$h displays a prompt informing the user that there are no expenses available.
- Use case ends.
Use Case: UC09 - Show UniCa$h Help
MSS:
- User enters the command to show help.
- User submits the request.
- UniCa$h opens help window with link to User Guide
-
UniCa$h displays the default welcome message with overview of commands
Use Case ends.
Extensions
- 2a. User enters an incorrect format.
- 2a1. UniCa$h displays an error message with the correct command format.
- Use case resumes at step 1.
Use Case: UC10 - Exit UniCa$h
MSS:
- User enters the command to exit UniCa$h.
- User submits the request.
-
UniCa$h displays exit message and application closes
Use Case ends.
Extensions
- 2a. User enters an incorrect format.
- 2a1. UniCa$h displays an error message with the correct command format.
- Use case resumes at step 1.
Use Case: UC11 - Set Budget
MSS:
- User enters the command to set the budget.
- User submits the request.
- UniCa$h parses the command, and it is in the right format.
- UniCa$h sets the global budget.
-
UniCa$h displays the new budget.
Use Case ends.
Extensions:
- 3a. UniCa$h parses command, and detects that user entered the incorrect format (missing fields)
- 3a1. UniCa$h displays an error message with the correct command format
- Use case resumes at step 1.
- 4a. UniCa$h contains existing budget.
- 4a1. UniCa$h replaces existing budget with new one.
- Use case resumes at step 5.
Use Case: UC12 - Clear Budget
MSS:
- User enters the command to clear the budget.
- User submits the request.
- UniCa$h clears the existing budget.
-
UniCa$h displays a success message.
Use Case ends.
Extensions:
- 3a. UniCa$h does not contain an existing budget.
- 3a1. UniCa$h displays a prompt to create a budget first.
- Use case ends.
Use Case: UC13 - Get Budget
MSS:
- User enters the command to get the budget.
- User submits the request.
- UniCa$h tabulates the expenditure relative to the budget set for the given interval.
-
UniCa$h displays the budget and the net amount of the budget.
Use Case ends.
Extensions:
- 3a. UniCa$h does not contain an existing budget.
- 3a1. UniCa$h displays a prompt to create a budget first.
- Use case ends.
Use Case: UC14 - Retrieve a transaction
MSS:
- User enters the command to retrieve (i.e.
get) a transaction. - User submits the request.
- UniCa$h retrieves the transaction based on the passed in arguments.
-
UniCa$h displays expanded details of that transaction
Use Case ends.
Extensions
- 2a. User enters an incorrect format.
- 2a1. UniCa$h displays an error message with the correct command format.
- Use case resumes at step 1.
Appendix: Instructions for manual testing
Initial launch
- Download the jar file (
unicash.jar) and copy it into an empty folder - Open a terminal and navigate to the folder
- Run
java --version, ensure that you are running on Java 11. If not, download and install Java 11. - Run
java -jar unicash.jar- Expected output: A GUI window should appear with the title “UniCa$h”, with a set of sample transactions.
Transactions
1. Adding a transaction
Use add n/Buying groceries type/expense amt/300 dt/18-08-2023 19:30 l/NTUC c/Food
Expected output: Transaction is added and a success message is displayed.
2. Deleting a transaction
Use delete 1
Expected output: Transaction is deleted and a success message is displayed.
3. Editing a transaction
Use edit 1 n/Buying groceries type/expense amt/300 dt/18-08-2023 19:30 l/NTUC c/Food
Expected output: Transaction is edited and a success message is displayed.
4. Listing all transactions
Use list
Expected output: All transactions are displayed.
5. Finding transaction(s)
Use find n/Buying groceries l/NTUC c/Food
Expected output: All transactions that match the specified filters are displayed.
6. Get a transaction
Prerequisite: There is at least 1 transaction stored in UniCa$h.
Use get 1
Expected output: The retrieved transaction is displayed.
7. Clear all transactions
Use clear_transactions
Expected output: All transactions are cleared and a success message is displayed.
Expenditure
1. Get total expenditure
Prerequisite: There is at least 1 transaction of category expense stored in UniCa$h.
Use get_total_expenditure month/10 c/Food year/2006
Expected output: The total expenditure is displayed.
Statistics
1. Summary statistics
Use summary
Expected output: The summary statistics window pops up and displays the summary statistics.
Budget
1. Set your budget
Use set_budget amt/300 interval/day
Expected output: Budget is set and a success message is displayed.
2. Get your budget
Use get_budget
Expected output: Budget is displayed.
3. Clear your budget
Use clear_budget
Expected output: Budget is cleared and a success message is displayed.
Utility
1. Reset
Use reset_unicash
Expected output: UniCa$h resets to default state and restores the sample transactions.
2. Help
Use help
Expected output: The help window pops up and displays the link to the User Guide. Message with all commands is displayed on the right panel.
Use help <command word> (e.g. help add_transaction)
Expected output: The help window pops up and displays the usage for the specified command.
3. Exit
Use exit
Expected: UniCa$h closes.
Appendix: Planned Enhancements
Get_Budget Command
-
The current
get_budgetcommand does not alter the transaction list when processing the expenses within the interval. This can lead to confusion as users may not be aware of the specific transactions that are being included in the calculation of the budget remainder, and as a result, mistaking the budget calculation as not working.We plan to apply a filter to the transaction list, like in
get_total_expenditure, whenget_budgetis run to accurately display the list of transactions that we have included for the calculation to reduce this potential user confusion. -
The current
get_budget’s weekly interval calculation uses the week of year. However, given that this information is not immediately intuitive to users, users may not be aware of how weekly budgets are calculated, leading to confusion.We plan to modify
get_budget’s weekly interval calculation to use the previous6days + today to make the command more intuitive for users.
Find Command
-
The current
findcommand is limited to searching for the name, location, and category of transactions only.We plan to add support for searching across all properties, including date & time, amount, and transaction type. This would allow users to have even more precise control over the scope of transactions search.
Auto Clear Transactions List Filter
-
Currently, the
find(as mentioned here) andget_total_expenditure(as mentioned here) commands have a persisting filter on the currentTransactions Listconfiguration.We plan to clear this filter on every command to avoid confusion.
Deletion Confirmation
-
The data deletion commands (
delete,clear_transactions,reset_unicash) currently do not have any confirmation required for execution. This means that the user can enter the command and the data deletion will be executed immediately.We plan to add and additional step of deletion confirmation as a layer of safety for the user’s data.
Summary Window
-
The current summary window is limited to showing the summary of expenses only.
We plan to extend this to showing a summary of incomes as well.
Command Box
-
The current
CommandBoxonly maintains user input history for up to10previous inputs.We plan to support the storing of a larger number of previous user inputs.
*Add Transaction
-
Currently, there is no warning for the input of excessively high incomes or expenses.
We plan to add a warning message to alert the users when such excessive amounts are added.
Appendix: Potential Features
Every user can…
- Divide a group spending and tag friends involved in the spending
- View a price list comparison of all available shops near NUS
- Set recurring transactions
- Support more than one global budget to allow users to set budgets for each category or different budgets for day/week/month
- Support more types of transaction such as
transfer - Delete transactions in batches (by day, by month, etc)
- Get suggestions for cheaper alternatives to their purchases based on their purchase history
- Manage multiple financial accounts within UniCa$h
- Get intelligent autofill suggestions for frequently input commands
- Export UniCa$h transactions data into a spreadsheet
- Import transactions from a spreadsheet into UniCa$h
Appendix: Effort
Migrating AB3 to UniCa$h
While we leverage the existing AB3 architecture, UniCa$h introduces two custom models: Transaction and Budget, both of which includes its own custom set of properties like Name, Amount, and Interval. These custom properties include new constraints that had to be thoroughly tested.
Although we were able to loosely reference the existing code from AB3 to build these custom models, the surrounding architecture such as ModelManager, UniCash, and UniCashStorage had to be altered to work with the new domain that UniCa$h introduces.
We had to alter ModelManager and UniCash to contain the relevant Transaction and Budget information. This involved adding additional methods to handle transaction and budget management. UniCashStorage was created to support persisting the transaction and budget data to a file. For this, we had to create JsonAdaptedX versions of the models like Transaction, Budget, and Category to ensure that the user’s data would be safely written to and reliably read from the storage file (taking inspiration from AB3’s JsonAdaaptedPerson).
Additionally, removing all dependencies to the old AB3 architecture such as the Person model or JsonAdaptedPerson was a big challenge as we had to ensure that doing so did not cause any regression to the new models and classes. However, it was also a good exercise in revealing unintended dependencies between UniCa$h and the old AB3 models and classes.
Increasing Test Coverage
The original AB3 project had a severe lack of coverage of the UI components and this resulted in bugs that may be difficult to replicate and that could be easily missed when performing manual testing. By implementing TestFX and modifying both Gradle and GitHub Actions, we were able to support UI testing. This raised our test coverage to over 90%!
TestFX has allowed us to create test suites for both individual UI components and integration tests that reduce the need to perform lengthy manual testing to ensure key UI behavior, providing a peace of mind that critical UI features were working as intended.
Appendix: Known Bugs
- Light scrollbars hard to see
- Help pop-up window shifts to the bottom left corner of the screen before re-centering on
helpcommand. Steps to reproduce the issue:- Type help in the command box.
- Shift the pop-up window to anywhere on the screen.
- Close the pop-up window.
- Type help in the command box again.
- The pop-up window will shift to the bottom left corner before re-centering itself.